 Discord
How to Deploy Your Self-Hosted Strapi CMS
May 01, 2025
Deploy a Strapi CMS instance on your server with this step-by-step guide.
Prerequisites
Before diving in, review Strapi's documentation for hardware requirements. Stormkit suggests at least 4GB RAM, 2 vCPUs, and 20GB storage for optimal performance.
- A GitHub account
- A self-hosted Stormkit instance for deployment
- Basic knowledge of Git and terminal commands
1. Create a Strapi Project
Start by creating a new Strapi project locally using the following command:
npx create-strapi@latest strapi
This command initializes a new Strapi project in a folder named strapi.
Follow the prompts to configure your project. For small-scale projects, using SQLite is fine, whereas for distributed systems PostgreSQL might be more appropriate. In this tutorial, we're going use an SQLite database.
Once complete, navigate to the project folder (cd strapi) and run npm run develop to verify the setup.
2. Modify the Code
While SQLite works perfectly for small scale applications, we suggest using a PostgreSQL database for larger scale projects.
By default, Strapi automatically sets up an SQLite database at .tmp/data.db. If the database is missing during a project build, Strapi will regenerate it which will cause the data to be wiped out when using SQLite as the data source. To mitigate this, we're going make use of the Stormkit's Persistent Volumes feature to upload the database and tell Strapi where to locate it.
- Go ahead and locate the
config/database.tsfile - Apply the following patch:
diff --git a/config/database.ts b/config/database.ts
index 1853ca4..ca8aeab 100644
--- a/config/database.ts
+++ b/config/database.ts
@@ -44,7 +44,7 @@ export default ({ env }) => {
     },
     sqlite: {
       connection: {
-        filename: path.join(__dirname, '..', '..', env('DATABASE_FILENAME', '.tmp/data.db')),
+        filename: env('DATABASE_FILENAME', path.join(__dirname, '..', '..', '.tmp/data.db')),
       },
       useNullAsDefault: true,
     },
This change will allow us using an absolute path for the DATABASE_FILENAME environment variable. Make sure to commit your changes:
git add .
git commit -m "chore: allow absolute path for sqlite databases"
Next, open your package.json and add the following script:
{
  "scripts": {
    // ... other scripts
    "start:stormkit": "rm -rf public/uploads && ln -s $VOLUME_PATH public/uploads && strapi start"
   }
}
And commit the changes:
git add .
git commit -m "chore: prepare the stormkit script"
This is needed to overcome Strapi's hard-coded upload path, which is relative to the project level. If we don't provide this script the uploaded files on Strapi won't be persisted.
3. Push to your GitHub repository
Once you committed the changes, push your changes to your repository.
# Make sure that the remote address exists
git remote add origin git@github.com:<your-repository>
git push -u origin HEAD
4. Deploy on Stormkit
Note: Strapi is a Node.js project and for now it works only on self-hosted Stormkit instances.
Importing the project
- Log in to your Stormkit account at app.stormkit.io.
- Click to
Create new app>Import from GitHub - Choose your Strapi project and click
Import
Configuring Volumes
If you haven't configured the volumes, follow these steps:
- Click on the
Volumestab in your environment page - Click on
Configure. - Make sure
Volume typeisFile system - Specify the root folder as
/shared/volumes - Click on
Save
This will tell Stormkit to upload persistent files under the /shared/volumes folder. Each environment has it's own folder. You can guess the folder name from the application and environment IDs, which is easily collectible from the URL. The folder structure uses the following format:
<volumes-base-path/a<app-id>e<env-id>`
For instance, if your URL looks like: /apps/5/environments/6 and your base path is /shared/volumes, the environment folder is located at /shared/volumes/a5e6. Note this path somewhere.
Configure your deployment
- Click on the
Configtab and locateServer settings - Provide the command that will start the server:
npm run start:stormkit - Click on
Save.
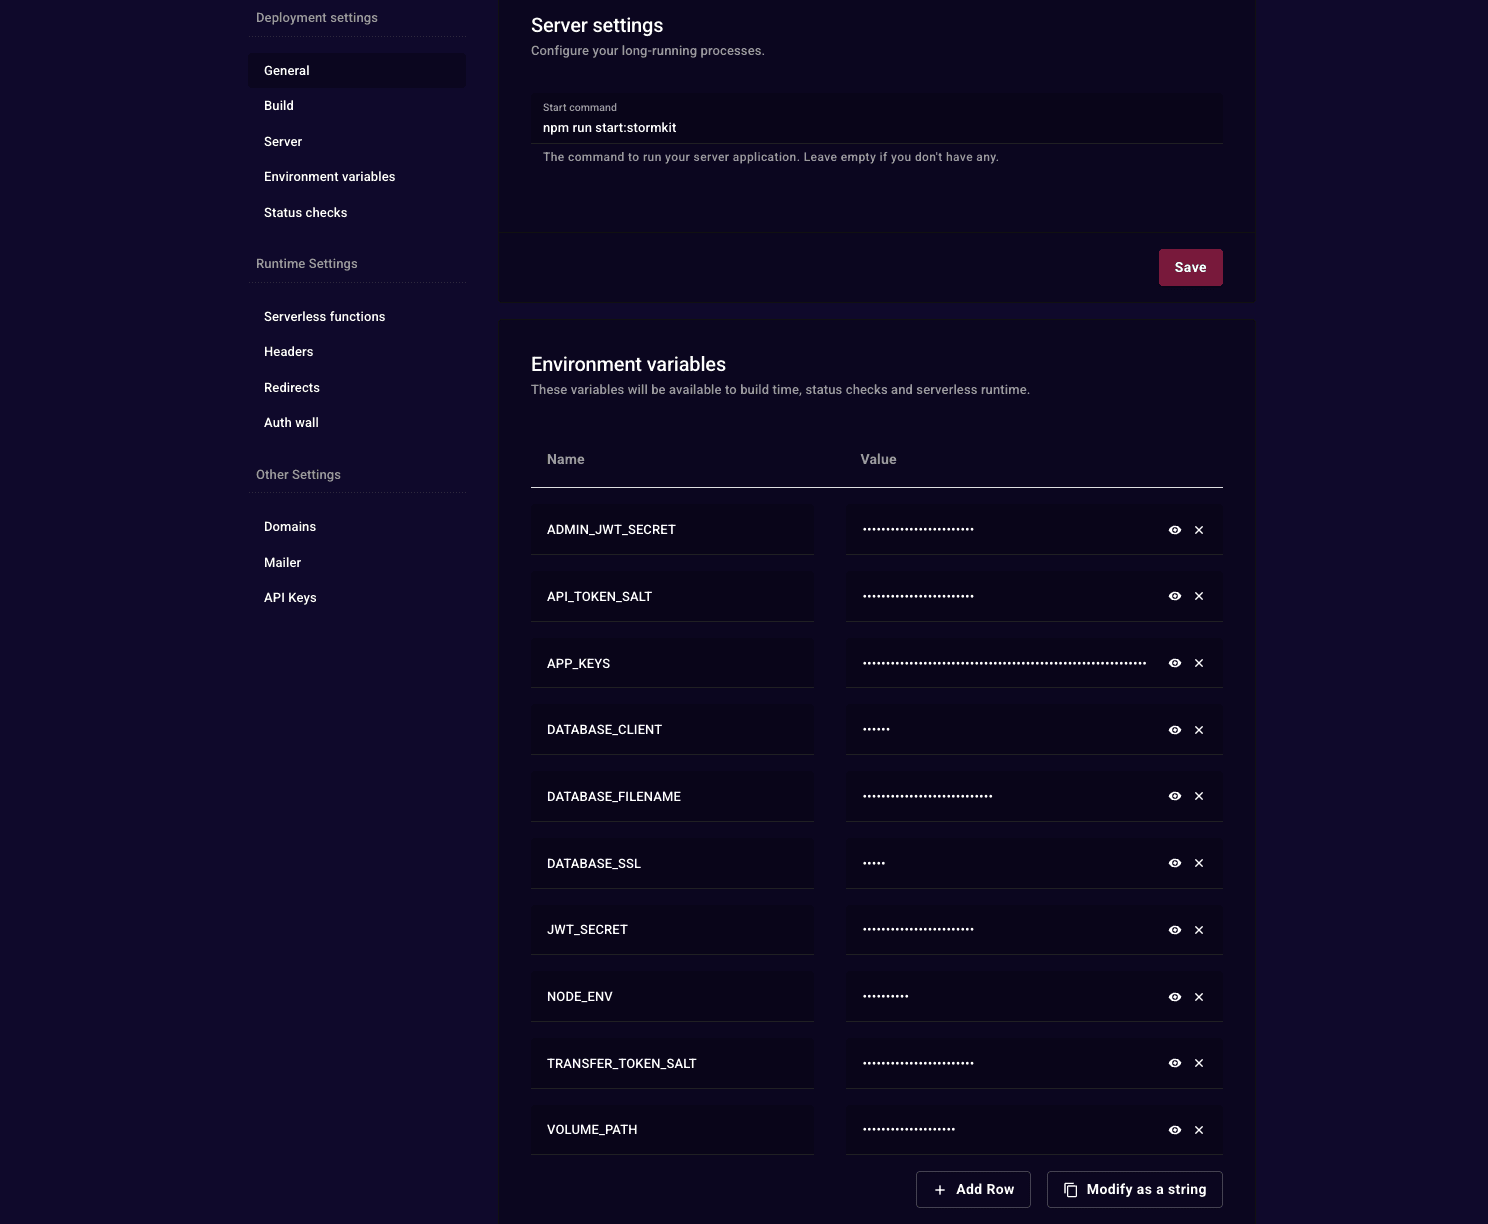
Next, we need to setup the environment variables.
- Scroll down to the
Environment variablessection - Click on
Modify as String - Copy the environment variables located inside the
.envfile in your Strapi project - Make sure
DATABASE_CLIENTissqliteandDATABASE_FILENAMEpoints to your volumes folder that you noted earlier - Add an additional environment variable
VOLUMES_PATHwhich points to the volumes folder
5. Verify the Deployment
Once you went through all the steps mentioned above, go ahead and Deploy your Strapi application. When the deployment is complete click on the Preview button to access your Strapi instance.
2026 Stormkit OÜ ©